Getting Started with Endpoint
Endpoint runs full .NET, Python, and C/C++ on a circuit. All three share one set of APIs, so what you learn in one language travels with you. You deploy and debug applications over a USB cable, no SSH, with no keys, passwords, or IP addresses.
Endpoint Domino24 is the evaluation board we built for Endpoint. We have not released SoMs or dev boards yet, because we are still shaping what the commercial product should be. Tell us what you need on the forum: what form factor, which peripherals, and whether wireless is a requirement.
Languages and tools
| Language | Version | VS Code | Visual Studio |
|---|---|---|---|
| C# | .NET 11 | Yes | Yes |
| Python | Python 3.14 | Yes | No |
| C and C++ | C23 and C++23, with no toolchain to install | Yes | No |
What you'll need
- Endpoint Domino24
- A USB-C cable
- A microSD card of at least 4 GB
- VS Code for any language, or Visual Studio for .NET
Step 1: Prepare the board
- Download the latest Endpoint OS image from the Downloads page.
- Write the image to the microSD card with a disk imaging tool such as balenaEtcher.
- Insert the card into Domino24 and connect it to your PC with the USB-C cable.
- Wait for the USER LED to light, which shows the board has finished booting.
Step 2: Install the extension
- Visual Studio
- Visual Studio Code
Visual Studio supports .NET (C#).
- Visual Studio 2026 (Community, Professional or Enterprise). VS 2022 17.9+ also works.
- The matching .NET SDK installed and on PATH (download).
- The Endpoint Debugger extension from the Visual Studio Marketplace. In Visual Studio, open Extensions > Manage Extensions and search for "Endpoint".
Visual Studio Code supports .NET (C#), Python, and C/C++, all three languages from the same extension.
- Visual Studio Code.
- The Endpoint Debugger extension from the Visual Studio Marketplace. In VS Code, open the Extensions view and search for "Endpoint".
- For each language you want to use:
Step 3: Create a project
Every Endpoint template is a ready-to-run blink application: it blinks the USER LED and prints a counter. Core and GPIO are referenced out of the box, so the project builds and runs without any extra setup.
- Visual Studio
- Visual Studio Code
-
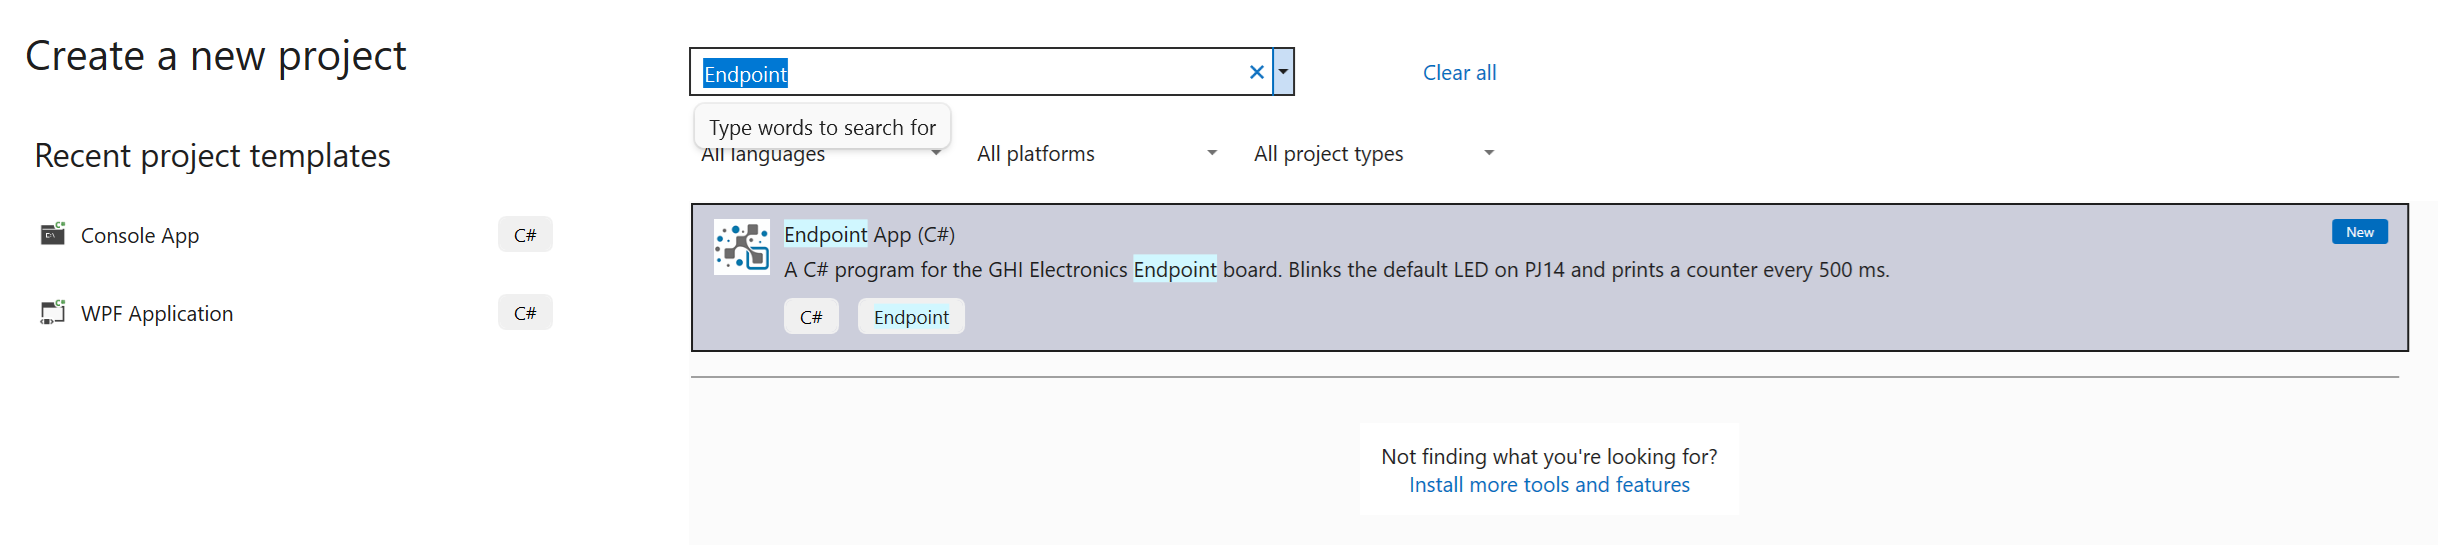
File > New > Project... → search "Endpoint" → choose Endpoint App (C#). Give it a name and location.
-
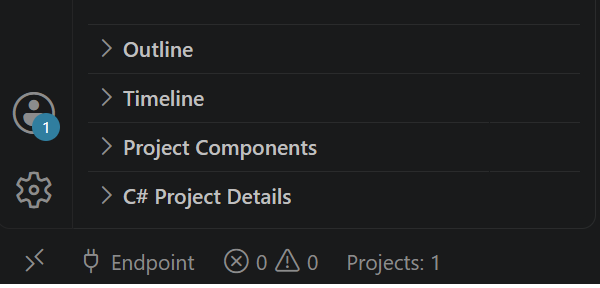
Plug the board in with USB. The status bar at the bottom of VS Code shows Endpoint when the board is detected:
-
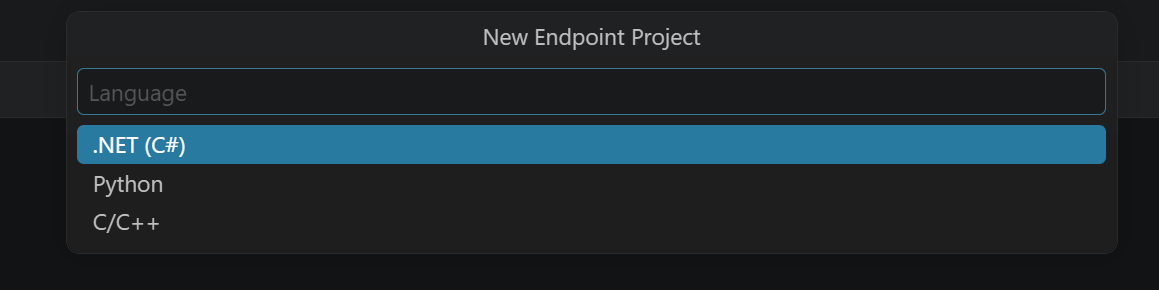
Ctrl+Shift+P → Endpoint: New Project... → pick a language (.NET, Python or C/C++), a name and a folder. VS Code opens the new project.
Step 4: Deploy and run
Make sure the USER LED on the board is on. A lit USER LED means the board has finished booting and is ready to accept a new program. If the LED is still off, wait a few seconds; a cold boot takes about three.
Press F5 or Ctrl+F5. Either command stops any application currently running on the board, including one set to run at boot, before deploying the new build, so you never need to disable the previous program by hand.
- Visual Studio
- Visual Studio Code
Press F5. Visual Studio builds the project, deploys it to the board over USB, and starts it under the debugger. Breakpoints, step, locals, and watch work as usual.
The USER LED blinks every 500 ms, and the Output window prints one counter line per blink:
Hello Endpoint. Counter: 1
Hello Endpoint. Counter: 2
Hello Endpoint. Counter: 3
...
Project settings live under the project's Endpoint property page:
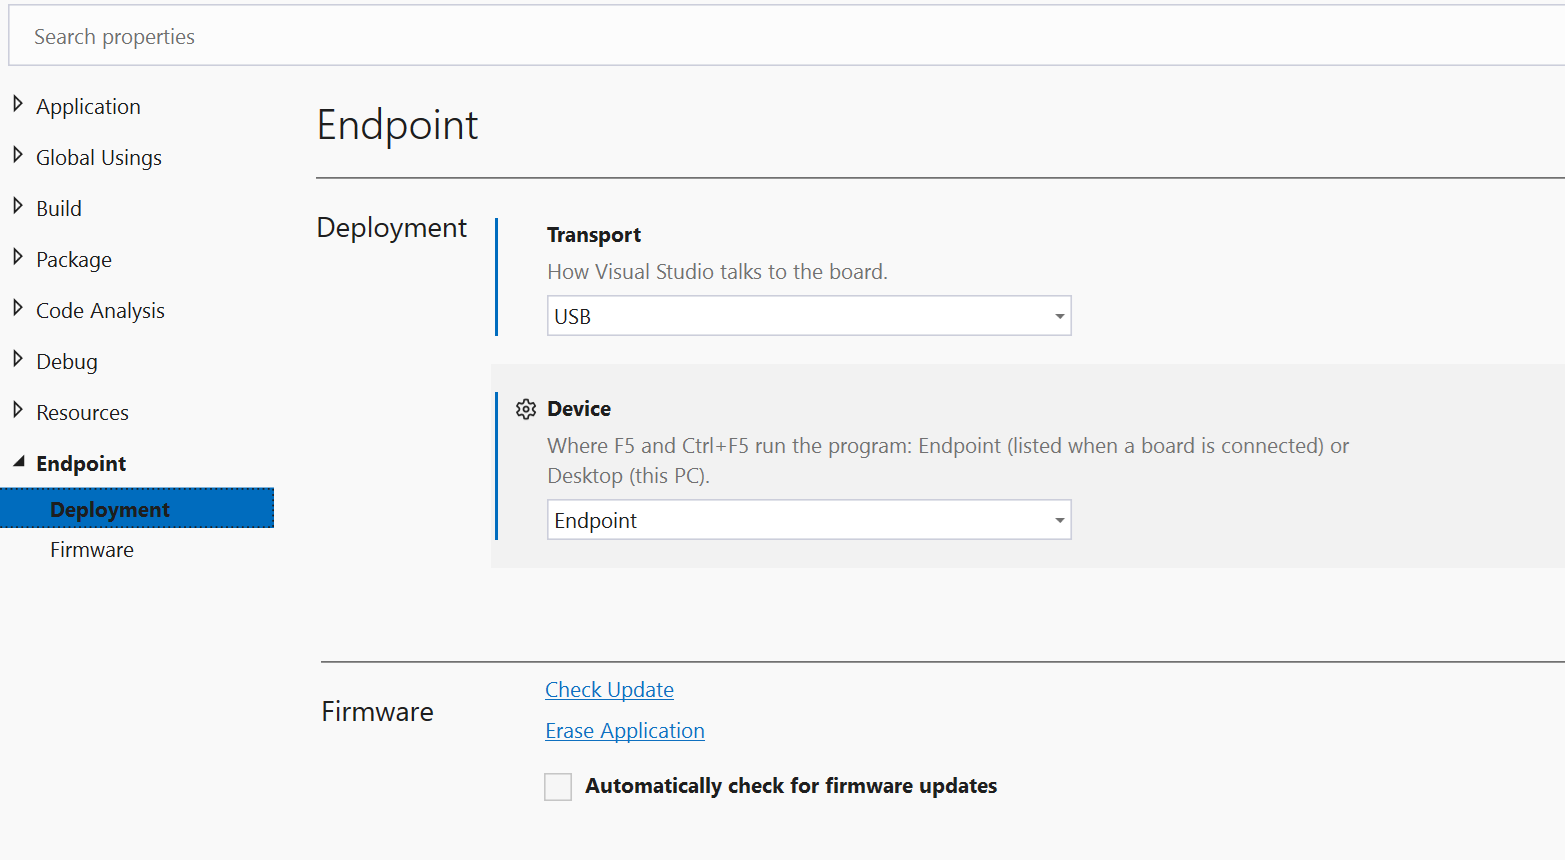
- Transport: how Visual Studio talks to the board. USB today.
- Device: Endpoint runs the program on the board; Desktop runs it locally on the PC for quick checks.
- Firmware: check for updates, erase the application that is set to run at boot.
Run at boot: press Ctrl+F5 instead of F5. The project is compiled with Native AOT and set to start automatically on power-on. A C# blink application goes from power-on to running in under three seconds.
Press F5. The extension builds the project, deploys it to the board over USB, and starts it under the debugger.
The USER LED blinks every 500 ms, and the Debug Console prints one counter line per blink:
Hello Endpoint. Counter: 1
Hello Endpoint. Counter: 2
Hello Endpoint. Counter: 3
...
If the board is not connected, is in use by another program, or is not responding, F5 stops with a clear message instead of running silently.
Run at boot: press Ctrl+F5 instead of F5. The project is compiled with Native AOT and set to start automatically on power-on. A C# blink application goes from power-on to running in under three seconds.
Step 5: Add a package
A new project already references Core and GPIO. Add the other Endpoint drivers (ADC, DAC, PWM, Display, Touch, Camera, Network, UI, and more) or any third-party library when you need them, and update to a newer version the same way.
- .NET (C#)
- Python
- C/C++
From the project folder, add or update a package with dotnet add package:
dotnet add package GHIElectronics.Endpoint.Devices.Adc --prerelease
In Visual Studio, use Manage NuGet Packages... on the project and check Include prerelease during the 0.5.x preview. Every third-party NuGet package installs the same way.
Open the integrated terminal in VS Code with Terminal > New Terminal:

Then run pip install:
pip install GHIElectronics.Endpoint.Devices.Adc
pip install pyserial
Packages install into the project's packages/ folder and are copied with your program on F5. Third-party packages such as pyserial, numpy, and pillow install the same way.
pip install only installs packages for the Endpoint board when it runs in VS Code's integrated terminal on an open Endpoint Python project. The VS Code extension intercepts pip in that terminal and routes the install into the project's packages/ folder.
Running pip install from an external Command Prompt, PowerShell, or Windows Terminal window installs into your PC's own Python instead, which does nothing for the board and will not be copied on F5.
The full C/C++ API is bundled with the extension, no package step. Include the header and use the namespace that matches each driver:
#include <endpoint.h>

using namespace GHIElectronics::Endpoint::Core;
using namespace GHIElectronics::Endpoint::Devices::Adc;

AdcController adc;
auto pin = adc.OpenPin(EPDomino24::Adc::PA0);
double volts = pin.ReadVoltage().Volts();
Third-party C/C++ source can be dropped into the project folder; every .cpp next to main.cpp is built into the program.
Step 6: Resources
Apps often need to ship data files: images for the UI, fonts for text, binary blobs for an attached chip, configuration text, TLS certificates. Endpoint gives you two ways to carry them with your program.
Load from file
The portable approach: drop the file into your project folder, F5 copies it to the board alongside your program, read it at runtime from the folder next to your app. Works identically in .NET, Python, and C/C++.
- .NET (C#)
- Python
- C/C++
using System.IO;
using GHIElectronics.Endpoint.Drawing;

var dir = AppContext.BaseDirectory;

// JPG
var imgBytes = File.ReadAllBytes(Path.Combine(dir, "resource_bg.jpg"));
var img = Image.Load(imgBytes);
canvas.DrawImage(img, 0, 0);

// Font
var fontBytes = File.ReadAllBytes(Path.Combine(dir, "Montserrat.ttf"));
using var font = Font.Load(fontBytes);
canvas.DrawText("Hello", font, 20, 60, 32, Color.White);

// Binary (push to SPI)
spi.Write(File.ReadAllBytes(Path.Combine(dir, "data.bin")));

// Text
var text = File.ReadAllText(Path.Combine(dir, "message.txt"));
Console.WriteLine(text);
Add this once to your .csproj so the files land next to the DLL:
<ItemGroup>
    <Content Include="Resources\**\*" CopyToOutputDirectory="PreserveNewest" />
</ItemGroup>
Everything under Resources\ is now deployed automatically.
from pathlib import Path
from GHIElectronics.Endpoint.Drawing import Canvas, Color, Font, Image, PixelFormat

here = Path(__file__).parent

# JPG
img_bytes = (here / "resource_bg.jpg").read_bytes()
img = Image.Load(img_bytes)
canvas.DrawImage(img, 0, 0)

# Font
font_bytes = (here / "Montserrat.ttf").read_bytes()
font = Font.Load(font_bytes)
canvas.DrawText("Hello", font, 20, 60, 32, Color.White)

# Binary (push to SPI)
spi.Write((here / "data.bin").read_bytes())

# Text
text = (here / "message.txt").read_text(encoding="utf-8")
print(text)
Files next to your .py script deploy automatically on F5, no project-file edit.
#include <endpoint.h>
#include <endpoint/Drawing.h>
#include <filesystem>
#include <fstream>
#include <iostream>
#include <string>
#include <vector>

namespace Drawing = GHIElectronics::Endpoint::Drawing;

static std::vector<uint8_t> ReadAll(const std::filesystem::path& p) {
    std::ifstream f(p, std::ios::binary | std::ios::ate);
    std::vector<uint8_t> buf(f.tellg());
    f.seekg(0);
    f.read(reinterpret_cast<char*>(buf.data()), buf.size());
    return buf;
}

auto here = std::filesystem::canonical("/proc/self/exe").parent_path();

// JPG
auto imgBytes = ReadAll(here / "resource_bg.jpg");
auto img = Drawing::Image::Load(imgBytes);
canvas.DrawImage(img, 0, 0);

// Font
auto fontBytes = ReadAll(here / "Montserrat.ttf");
auto font = Drawing::Font::Load(fontBytes);
canvas.DrawText("Hello", font, 20, 60, 32, Drawing::Color::White());

// Binary (push to SPI)
auto blob = ReadAll(here / "data.bin");
spi.Write(blob.data(), blob.size());

// Text
std::ifstream t(here / "message.txt");
std::string text((std::istreambuf_iterator<char>(t)), {});
std::cout << text << std::endl;
Files next to main.cpp deploy automatically on F5, no project-file edit.
Embedded Resource (.NET only)
.NET lets you bake files into the compiled DLL so your app ships as a single binary. Python and C/C++ do not have this; use the file approach above.
In Visual Studio, right-click the file in Solution Explorer, Properties, Build Action = Embedded Resource. In VS Code, edit the .csproj directly:
<ItemGroup>
    <EmbeddedResource Include="logo.jpg" />
    <EmbeddedResource Include="Montserrat.ttf" />
    <EmbeddedResource Include="data.bin" />
    <EmbeddedResource Include="config.txt" />
</ItemGroup>
Tip: <EmbeddedResource Include="Resources\**\*" /> embeds everything under a Resources\ folder without listing files individually.
Read at runtime with Assembly.GetManifestResourceStream:
using System.IO;
using System.Reflection;
using System.Text;

static byte[] ReadResource(string name) {
    using var s = Assembly.GetExecutingAssembly().GetManifestResourceStream(name)
        ?? throw new InvalidOperationException($"Resource '{name}' not found");
    var buf = new byte[s.Length];
    s.ReadExactly(buf);
    return buf;
}

var jpg  = ReadResource("MyApp.logo.jpg");
var ttf  = ReadResource("MyApp.Montserrat.ttf");
var blob = ReadResource("MyApp.data.bin");
var text = Encoding.UTF8.GetString(ReadResource("MyApp.config.txt"));
The resource name is <RootNamespace>.<folder-with-dots>.<filename>. To see the exact names baked into your DLL:
foreach (var n in Assembly.GetExecutingAssembly().GetManifestResourceNames())
    Console.WriteLine(n);